- Eyedropper
Right-clicking on map view sets the tile at the clicked position as the tile to draw. Right-clicking a position where both upper and lower-level tiles have been drawn sets both of them as the tiles to draw in an overlapping state.
- Auto Tile
Some tiles on the tile palette's A tab include a feature known as auto tile. The auto tile feature has multiple patterns for each type of tile. Boundaries will be automatically adjusted according to how tiles are arranged. Tile types A1 through A4 in the tileset database have the auto tile feature.
Note that you can temporarily disable the auto tile feature by holding down the Shift key while drawing tiles or using the eyedropper.
- Automatic Shadow Generation
Arranging two or more auto tiles vertically will automatically draw a shadow on the bottom right side of some tiles. However, there are other tiles where no shadow will be drawn.
- Shadow Pen

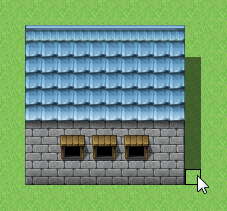
The shadow pen is a tool for drawing wall and building shadows. It allows you to shade one-quarter of a tile.
To edit a map with the shadow pen, click the Shadow Pen button on the toolbar (or select Shadow Pen on the Draw menu), and then click on the map view. Clicking where there is no shadow will draw one, and clicking where there already is a shadow will erase it.
- Special Specifications for Lower-Layer Tiles
The A2 tiles in the tileset under the tile palette's A tab (rows three through six) are divided into base tiles (columns one through four from the left) and embellishment tiles (columns five through eight from the left). Embellishment tiles can be placed on top of base tiles.
However, with tilesets where Mode in the tileset dialog box is set to Field type, placing embellishment tiles over base tiles selected from columns two or four transforms them into column-one or three base tiles.
 Pencil
 Rectangle
 Oval
Oval Fill
Fill